Let’s look at how to create motion graphic transitions using Adobe After Effects.
Transitions can indicate changes in location, time, or perspective within a video. For instance, a fade or dissolve transition can signify a change of location or passage of time between scenes. These visual cues help the audience understand the narrative flow and keep them engaged. The type of transition we’re going to break down in this article is extremely beneficial for anybody editing videos for a client. By using animations for transitions you get to match the “color aesthetic” of the brand you’re working with. It’s an amazing way to make your videos seem tailor-made to their marketing goals and needs. It will make you look great when sending that V1 video over.
These types of transitions are different from your typical “video transitions” like a crossfade or a fade to black, a dissolve, or whatever other transition you can think of that just features your shot blending into the next without any additional graphic edited into the cut. These are specifically motion graphic transitions, so think colorful objects, shapes, and formations that move and transform one shot into the next. If you want a great example of what I’m talking about, check out the tutorial below!
Creating a Colorful Wipe Transition
I think the general standard motion graphic transition is something like a colorful rectangle swipe. Visually, it’s a rectangle moving across the screen, either from left to right or vice versa, while the video transitions from one shot to the next. If you’re in the business of online content creation or corporate videos, this is an industry staple. So, let’s get started!
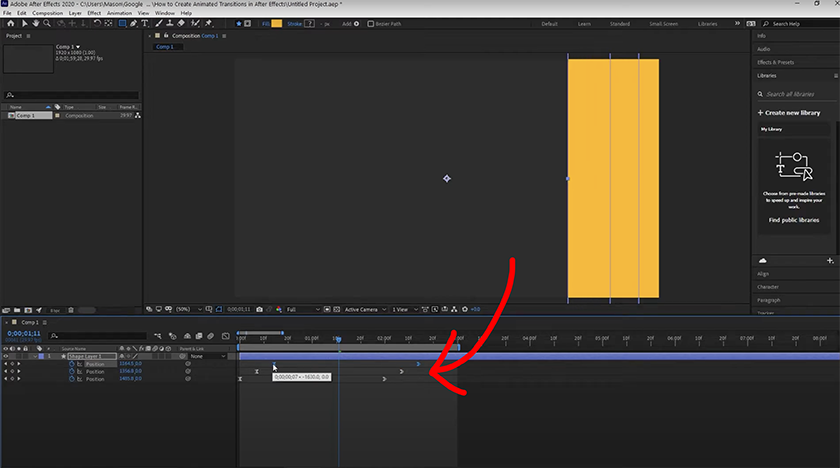
First we’re going to create a Shape Layer in our new composition. Next, under your Shape Layer, click “Add,” and then select “Group”. Once you’ve done this, select “Add” again, and choose “Rectangle.” Then hit “Add” again, choose “Fill,” and select whatever color you’d like!
If you want to change the overall size and shape of the rectangle, just open up the Rectangle path and adjust the size accordingly! From here, we’ll start to set our keyframes to kick off the animation of our rectangle. Move your playhead to a few seconds ahead in your timeline. Then under “Position” in the Transform properties, move the shape off screen to the right, then click on the keyframe button. Now move the playhead to the start of your timeline, then change the Position of the rectangle offscreen to the left, and make a keyframe.

Make sure to hit Shift F9 (easy ease) over your keyframes to smooth out those movements. When you apply the Easy Ease tool to a keyframe, it adjusts the velocity of the animation, slowing down the movement as it approaches the keyframe and then gradually speeding up as it moves away from it. This easing effect helps to create smoother transitions and avoids abrupt or jerky motion. We don’t want the transitions looking like they came from PowerPoint or Movie Maker!
If you want to make the transition a bit more dynamic by adding additional shapes with different colors, all you have to do is duplicate Group 1 (in your composition) by hitting Control-D. Then, offset these new keyframes just slightly before and after your first rectangle, and the new shape will follow closely behind your first one! Remember to change the color of the new rectangle.
Once you’ve completed these steps, you’ll have a beautiful, professional-looking animated transition! Be sure to save the transition so you can use it quickly in your next project. Go to Animation > Save Animation Preset.
In order to apply this transition to your video and feature two clips playing on each side of the animated shapes, we’ll need to export the transition accordingly. Go to File > Export > Add to Render Queue. Then you’ll want to choose to “export as a Quicktime file,” then under Video output, be sure to select RGB+Alpha under the “Channel” dropdown. This will give you that transparent background you need for throwing this animation on top of footage.
Using Null Objects
Another great way to add more to your transition is to create several different shapes in various sizes and colors — make them whatever you want! Once you’ve done this, you can align every once of these shapes to match the exact speed and movement you need by creating a Null Object in your composition.
A null object is an invisible, empty layer that serves as a control or reference point for other layers in your composition. It doesn’t have any visible content, but you can use it to control the position, rotation, scale, and other properties of other layers.
Other Types of Transitions
Now, let’s say you don’t want to make that specific type of “shape” transition. Maybe you want something a little less “YouTube” feeling, or more subtle — we’ve got the tutorial for you! Whether it’s a crash zoom, blur, or color distortion, After Effects gives you so many more capabilities to get creative with your transitions. Olufemii put together this comprehensive list of 10 incredibly easy After Effects transitions for you to try out.
Even if you end up not using one of these transitions, I’ve always found following tutorials such as this extremely beneficial for my own understanding of After Effects. The more I know about which tools do what, the more comfortable and confident I feel while using the software.
Looking for filmmaking tips and tricks? Check out our YouTube channel for tutorials like this . . .


