
The impulse response is a room’s tone after some big sound happens. Here’s how you record it properly.
Having your very own impulse responses can be rather handy, especially in the world of filmmaking. You have a specific space to shoot a scene, and you want the reverb to be of that space. Well, instead of using a reverb plugin, there are ways to capture the location’s exact reverb profile. These are known as impulse responses. So, how do we record them?
What Is an Impulse Response?
An impulse response is a recording of an acoustic space. By taking a transient and loud sound, such as popping a balloon, a starter pistol, a handclap or a sine sweep, recording these impulses gets the room to resonate, thus creating reverb.
The recording will consist of the impulse and the room’s response. This can be loaded into a convolution reverb plugin and you’ll have your own impulse response.
So, How Do We Record an Impulse Response?
Recording high-quality, professional standard impulse responses requires a lot of top-grade equipment, however, it can be done with very minimal equipment and still yield great quality. The bare essentials required are a recording device, a microphone (a handheld recorder will do perfectly), a stand, objects for the impulses, a DAW for editing, and of course, an acoustic space. A really great place to start is either a room in your home that has some obvious reverb (a room with high ceilings) or a space like an empty car park. The more reverberation, the better!
Some DAWs have an impulse response creator tool. Suppose you own Apple’s Logic Pro. In that case, you have access to their Impulse Response Utility, which is a great tool for creating impulse responses with a sine sweep, a more accurate way of obtaining impulse responses. If you don’t own Logic Pro, MLSTool is a free program that does the same as Logic’s utility, except it uses white noise as the impulse source.
After obtaining the impulse response file, having a DAW with a convolution reverb plugin will allow you to load it into the plugin, and there you’ll have your custom reverb.
So, let’s break this process down.
Microphone Placement and Gain levels
Once you’ve found a space you’d like to use, establish a few placement options for the microphone. This gives us more reverb options as placing a microphone near the wall will have a different result than centering it in the room. With that, when recording the impulse, it’s good to experiment with the sound placement, whether that’s in front of the microphone, behind, or beneath it.
If you’re using a handheld recorder that uses two mics, ensure that you are at least in front, behind, or underneath the microphone for stereo balance. We don’t want an unbalanced impulse recording! You can record in mono, however, the sonic field is much more limited than it is in stereo.
As there will be a pretty loud impulse being generated, ensure the gain levels are set correctly. Not doing so will cause a booming sound in the recording, which will distort the impulse response. This is more common in transient impulses than sine sweeps so always take care when auditioning the sound and ensure you are not too close to the microphone. Aiming for around 4-5dB of headroom is a suitable level to peak at. This may take some time to adjust, but will be worth it in the end!
Transient Impulse
As mentioned, we want sound sources that have strong transients to help resonate the room. Objects like a balloon, a hardcover book, or just a mere handclap will be perfect options.
When using multiple impulse sources, after hitting record, say the source and the location of the microphone and source to keep organised (trust me, it’ll make the editing process less confusing!).
Formatting-wise, it’s best to use 24-bit and WAV for the highest quality. You can go higher to 32-bit if you want more accuracy, but keeping it the same bit rate as your project will maintain consistency.
Leave enough silence after triggering the impulse as we don’t want to cut the reverb tail too early. Lastly, it’s good to ensure you are in a location that is quiet enough and away from invasive background noise.
Here’s an insightful video from Reaper Blog on creating DIY Impulse Responses, explaining the various steps from setting up to editing.
The editing stage is fairly simple. You will need to crop accordingly — right before the transient and the very end when the reverb tail has completely disappeared. Applying a slight fade at the beginning and end will smooth out the recording to avoid any clicking sounds.
The last step is to load it into a convolution reverb plugin. DAWs like Logic, Ableton and Reaper have stock plugins that allow you to load in your impulse responses.
Sine Sweep Impulse
Another method is to use a sine sweep played through a speaker as it provides a better signal-to-noise ratio, as well as better accuracy in all frequency ranges. The downside to this is that you will need to have access to a sine sweep, as well as a speaker, so opting for objects like a balloon, a book, or just a simple handclap is a much easier solution.
Logic Pro’s IR Utility uses a sine sweep for impulse responses, and it is a great tool for anyone who already owns this DAW and is looking to experiment with making their own impulse responses to use in Space Designer (stock convolution reverb plug-in in Logic).
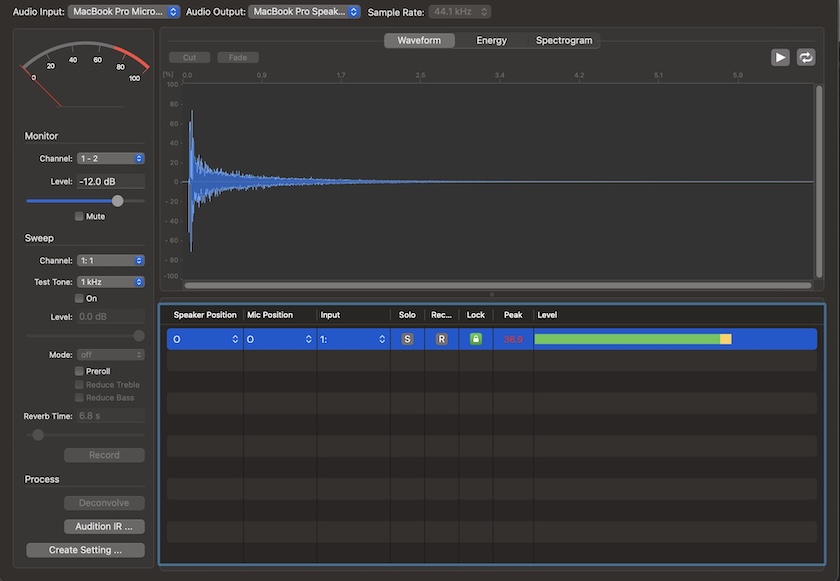
Every track lane has several parameters, including speaker and mic position, mic input, solo, record, lock, and a level meter. It also has a VU meter to measure the signal level of the sweep, which helps greatly with volume monitoring.
The sine sweep is from 20Hz to 20 kHz and has a few parameters where you can select the input channel, a test tone, a level slider, and a reverb time, allowing you to set the maximum recording time. You can also turn the sweep off in the mode drop-down menu if you want to record a transient.
To find out more about using this specific tool, here’s a link to Apple’s overview guide. They have a link to Apple Books, which has the full manual (for Mac users ONLY).
Depending on the number of tracks you have, each will be recorded separately. For example: if you want to record mono/omni tracks to a five-channel impulse response, this is a CPU-friendly way of recording a surround sound configuration. then, all of these tracks will be combined to create a uniform impulse response. This is done in the Deconvolution process.
Deconvolution
Sine sweeps, unlike transient impulses, need a process called deconvolution. All the echoes and reflections have been recorded over the length of the sine sweep. The de-convolution process aligns the time and level of all the recorded reflections over time and places them at the beginning of the file.
In logic’s IR Utility, simply select “Deconvolve,” which will leave you with a usable impulse response. The next step here is to edit, which may include cropping, fades, and de-noise.
Once you are happy with the result, the last step is to create a setting so you can use it inside Space Designer. If you’re using a tool like MLSTool, you’ll need its partner plug-in Convology XT to be able to use the impulse response. in Logic’s IR Utility, this will be saved as a .sdir file and will provide you with a pathway to locate the file.
Do I need Impulse Responses?
It may seem like a bit of a laborious process recording your own impulse responses, and you may question whether you need to do this.
With convolution reverb made very accessible in many DAWs that include a wide variety of unique spaces, having your own impulse responses isn’t something you should inherently worry about. However, you may have a scenario when scouting a location for a project, and you decide that the room reverberation is a contributing factor to the space. Finding a reverb that emulates its character may be a challenge, but having the option to record your own impulse response can provide you with the exact acoustic profile. It’s also a fun and interesting activity, and having your impulse responses may be useful in future sound design projects.
Here’s a great video from Free To Use Sounds where they exhibit some really great results from a parking lot. Using Ableton’s convolution reverb, you have the ability to reverse impulse responses, which can provide some unique reverbs, perfect for sound design.
Nevertheless, being able to create your own impulse response is a fantastic way to practice audio recording, as well as sound design and room acoustics. While DAWs will already have an abundance of convolution reverbs with banks of impulse responses, there’s no harm in trying your own.
Cover image via Freepik.
Looking for filmmaking tips and tricks? Check out our YouTube channel for tutorials like this . . .